
To help you get the most enjoyment out of your Graco Milestone car seat, we’ve put together this Milestone tutorial page. On this page you’ll find help with:
And (as they say in infomercials) much, much more!
Graco Milestone Car Seat Tutorial YouTube
Here are the best YouTube videos we could find to help you learn to use your Graco Milestone car seat:
Netmums’ Influencers Network has a great 6-minute review that covers the features of the Graco Milestone car seat:
Michael Howard provides a 10-minute detailed review and demo for the Graco Milestone car seat:
Kiddicare has an excellent video that shows you how to install the Graco Milestone car seat:
Graco Children’s Products has a detailed video that show you how to remove and replace the car seat cover of the Graco Milestone car seat:
Installation Questions
How to Install Graco Milestone Car Seat Forward-Facing
You can install forward-facing using Graco Milestone car seat with either the LATCH strap or vehicle seat belt:
- 1Ensure the LATCH strap is in the forward-facing belt path (marked with an orange label).
- 2Recline the car seat so that it is in recline position 3 or 4.
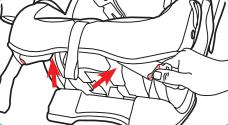
- 3Push in on the red buttons on the LATCH connectors and remove them from storage location (please see image below taken from the Instruction Manual).
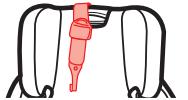
- 4Unhook tether and lay it in the seat (please see image below taken from the Instruction Manual).
- 5Extend the LATCH strap to its maximum length.
- 6Place the car seat forward-facing in the vehicle’s back seat. Push the car seat firmly so that the back of the car seat touches the vehicle seat back.
- 7Connect LATCH connectors to the vehicle’s lower LATCH anchors (please see image below taken from the Instruction Manual). Ensure the strap is not twisted.

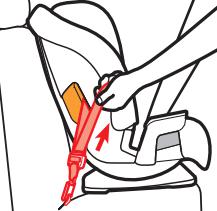
- 8Press down firmly at the center of the car seat and tighten the LATCH strap (please see image below taken from the Instruction Manual).
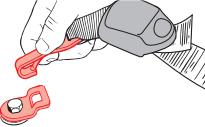
- 9Attach the top tether strap (please see image below taken from the Instruction Manual) and tighten it.
- 1Recline the car seat so that it is in recline position 3 or 4.
- 2Push in on the red buttons on the LATCH connectors to the plastic bar and tighten the strap (please see image below taken from the Instruction Manual).

- 3Place the car seat forward-facing in the vehicle’s back seat. Push the car seat firmly so that the back of the car seat touches the vehicle seat back.
- 4Unhook tether and lay it in the seat (please see image below taken from the Instruction Manual).

- 5Route the vehicle seat belt through the forward-facing belt path that is marked with an orange label (please see image below taken from the Instruction Manual). Buckle the seat belt and ensure that it is not twisted.
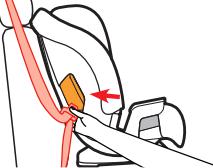
- 6Lock the vehicle seat belt by slowly pulling the shoulder belt all the way out and letting it go. After hearing a clicking sound, slowly pull the belt to ensure it is locked.
- 7Press down firmly at the center of the car seat and pull on the shoulder belt to tighten while feeding the slack back in the retractor (please see image below taken from the Instruction Manual).
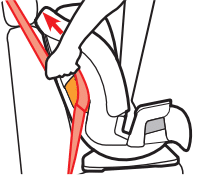
- 8Attach the top tether strap (please see image below taken from the Instruction Manual) and tighten it.

How to Install Graco Milestone Car Seat Rear-Facing
You can install Graco Milestone 3-in-1 car seat rear-facing with either the LATCH strap or vehicle seat belt:
- 1Ensure the LATCH strap is in the rear-facing belt path (marked with a blue label).
- 2Recline the car seat so that it is in recline position 1 or 2.
- 3Push in on the red buttons on the LATCH connectors and remove them from storage location (please see image below taken from the Instruction Manual).

- 4Extend the LATCH strap to its maximum length.
- 5Place the car seat rear-facing in the vehicle’s back seat. The front of the car seat must touch the vehicle seat back.
- 6Adjust the seat until the ball is completely in the blue zone in the Rear-facing Level Indicator. Your vehicle must be on level ground when you check the indicator.
- 7Connect LATCH connectors to the vehicle’s lower LATCH anchors (please see image below taken from the Instruction Manual). Ensure the strap is not twisted.

- 8Press down firmly at the center of the car seat and tighten the LATCH strap (please see image below taken from the Instruction Manual).
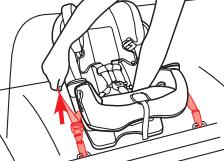
- 9Check the rear-facing Level Indicator again to ensure the ball is completely within the blue zone. Readjust the car seat or place rolled towels under the car seat if needed.
- 1Recline the car seat so that it is in recline position 1 or 2.
- 2Store the top tether hook. Push in on the red buttons on the LATCH connectors and remove them from storage location (please see images below taken from the Instruction Manual).

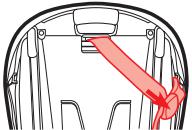
- 3Remove the slack from both straps.
- 4Place the car seat rear-facing in the vehicle’s back seat. The front of the car seat must touch the vehicle seat back.
- 5Adjust the seat until the ball is completely in the blue zone in the Rear-facing Level Indicator. Your vehicle must be on level ground when you check the indicator.
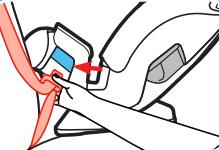
- 6Route the vehicle seat belt through the rear-facing belt path that is marked with a blue label (please see image below taken from the Instruction Manual).
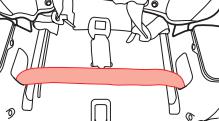
- 7Ensure the strap is not twisted. The vehicle seat belt must be in front of the buckle strap (please see image below taken from the Instruction Manual).
- 8Lock the vehicle seat belt by slowly pulling the shoulder belt all the way out and letting it go. After hearing a clicking sound, slowly pull the belt to ensure it is locked.
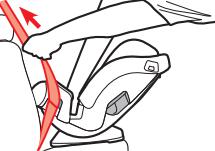
- 9Press down firmly at the center of the car seat and pull on the shoulder belt to tighten (please see image below taken from the Instruction Manual).
- 10Check the rear-facing Level Indicator again to ensure the ball is completely within the blue zone. Readjust the car seat or place rolled towels under the car seat if needed.
How to Convert Graco Milestone to Booster
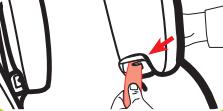
- 1Store the harness by following the steps below.
- 2Recline the car seat so that it is in recline position 4.
- 3Place the car seat forward-facing in the vehicle’s back seat. The base of the car seat should sit as flat as possible on the vehicle seat.
- 4Route the vehicle shoulder belt through the shoulder belt guide found on the headrest (please see image below taken from the Instruction Manual).
Common Usage Questions & Problems Related to Graco Milestone Car Seat
How do you know when your Graco Milestone car seat is installed tight enough?
To check whether the car seat is installed tight enough, please follow the steps below.
- 1Grab the sides of the car seat where the LATCH strap or vehicle seat belt is.
- 2Slide the car seat side to side.
- 3Slide the car seat front to back.
- 4The car seat is tight enough if the seat moves less than 1 inch.
Can the Graco Milestone be used after a minor crash?
No, the Graco Milestone car seat must be replaced after a crash. Even a minor crash can cause unseen damage to the car seat. Using the car seat again may result in injury or death.
When to remove Graco Milestone infant insert
You may remove the infant insert when your baby no longer needs it. If your baby’s shoulders are above the bottom slots without the insert, you may remove the insert.

Growing up I was a carefree male going about life like there was no tomorrow. Naturally, I ‘grew’ up, settled down and started a family.

Going from an independent carefree male to a family man was somewhat of a U-turn and required a lot of learning. Luckily for me, my wife works in education and has always been the shining light always ahead of me on all factors kids related.
Initially, my wife didn’t have a driving license (luckily this has now changed and it does make life easier), and all things car related were my task. Child locks were the obvious starting point which lead me down a rabbit hole.
So far we have personally tested dozens of convertible car seats and have owned five despite neither of our kids having reached the age of 5! Simply put, a car seat can be great on paper, work great on trying out but can fail on you in real life.
This is why I have put together this website – to help inform and educate you!
Of course, as I mentioned above, at the end of the day your experience will be the best test so I’d love to hear your experiences and feedback in the comments.
To contact me personally, please do so through my contact page.
I look forward to hearing from you!
Peter
P.S. If you click a link on my site and end up buying a car seat on Amazon, I’ll get paid a small commission (or as the Amazon lawyers put it: “As an Amazon Associate I earn from qualifying purchases”)
My child can undo the car seat clip, I want to make the strap hide the buckle or change out the buckle altogether. On this particular model, I cannot get access to the splitter plate underneath the car seat to be able to change the buckle. I have undone every single screw to try and get access. Idk how to get to the splitter pls yr that would allow to change the visibility of the buckle clip or change the clip to something a lot safer and harder to push to get off of. My child unbuckled himself on the highway and it was terrifying. Thank you for any feedback.